Leveraging the CertificateUserIds Attribute to Enable Certificate-Based Logon for Privileged Accounts in Entra ID
- Gabriel Delaney
- Sep 5, 2025
- 3 min read
Most administrators in the public sector are probably used to the concept of Personal Identity Verification (PIV) or Common Access Card (CAC) authentication – I’ll be using PIV for both in this article. In many ways with PIV, government agencies have been using passwordless phishing-resistant strong authentication long before it became the industry standard. However, as the public sector has moved to the cloud their accounts with privileged roles oftentimes leverage standard MFA like Microsoft Authenticator or worse, SMS. In this post, I’ll break down how to leverage the userCertificateIds attribute in Microsoft Entra ID (formerly Azure AD) to allow certificate-based logon for admin accounts.
Prerequisites
For this post, I’m assuming you’ve got Certificate-Based Authentication (CBA) set up. That’s a nontrivial step but is well-documented elsewhere. I’ll also assume that your admin accounts are cloud-only and not synced from on-prem, if not, they should be. Instead, we’ll focus on how to link the certificate you’ve already got on your PIV to the user in Entra, effectively enforcing a strong factor for admin accounts.
Leveraging UserCertificateIds’ Multiple Name Mappings
On-premises Active Directory you can use altSecurityIdentities to map certificates to more than one account using name mappings. Providing the flexibility to associate a single PIV to both a standard and privileged user account. With userCertificateIds in Entra ID, we have a roughly analogous mechanism: you pick the relevant certificate attribute (Issuer/Serial Number, SKI, PrincipalName) and attach it to a user object so that Entra ID recognizes the credential for authentication. The big difference? You can’t reuse the same name mapping (like the same Subject/Issuer) for more than one account in your tenant. It simply won’t let you. With Microsoft recommending Issuer/Serial Number in kb5014754 I often use Subject Key Identifier (SKI) when mapping certificates for privileged accounts to bypass the same name mapping limitation, maintain a strong mapping, and get the same functionality as altSecurityIdentities. However, you can use whatever combination of mappings that work for you, these are all the options you have:
Certificate mapping Field | Examples of values in certificateUserIds |
PrincipalName | X509:<PN>bob@woodgrove.com |
PrincipalName | X509:<PN>bob@woodgrove |
RFC822Name | X509:<RFC822>user@woodgrove.com |
IssuerAndSubject | X509:<I>DC=com,DC=contoso,CN=CONTOSO-DC-CA<S>DC=com,DC=contoso,OU=UserAccounts,CN=mfatest |
Subject | X509:<S>DC=com,DC=contoso,OU=UserAccounts,CN=mfatest |
SKI | X509:<SKI>aB1cD2eF3gH4iJ5kL6mN7oP8qR |
SHA1PublicKey | X509:<SHA1-PUKEY>cD2eF3gH4iJ5kL6mN7oP8qR9sT |
IssuerAndSerialNumber | X509:<I>DC=com,DC=contoso,CN=CONTOSO-DC-CA<SR>21436587 |
Adding a New Name Mapping in Entra
Let’s get started:
1. Open the Entra Portal with at least an Authentication Policy Administrator
2. Go Protection > Authentication methods > Certificate-based authentication
3. Under Configure > Scroll down to Username binding and select + Add rule. We already have issuer and serial number which we have been using for our standard users. We are going to add SKI.


4. Now that we have SKI as a name mapping, we can use the same PIV card that’s mapped to users with Issuer and serial number and map it to their privileged accounts.
Updating Our Privileged Account’s UserCertificateIds
1. For the SKI mapping we just added, extract the Subject Key Identifier from your certificate.

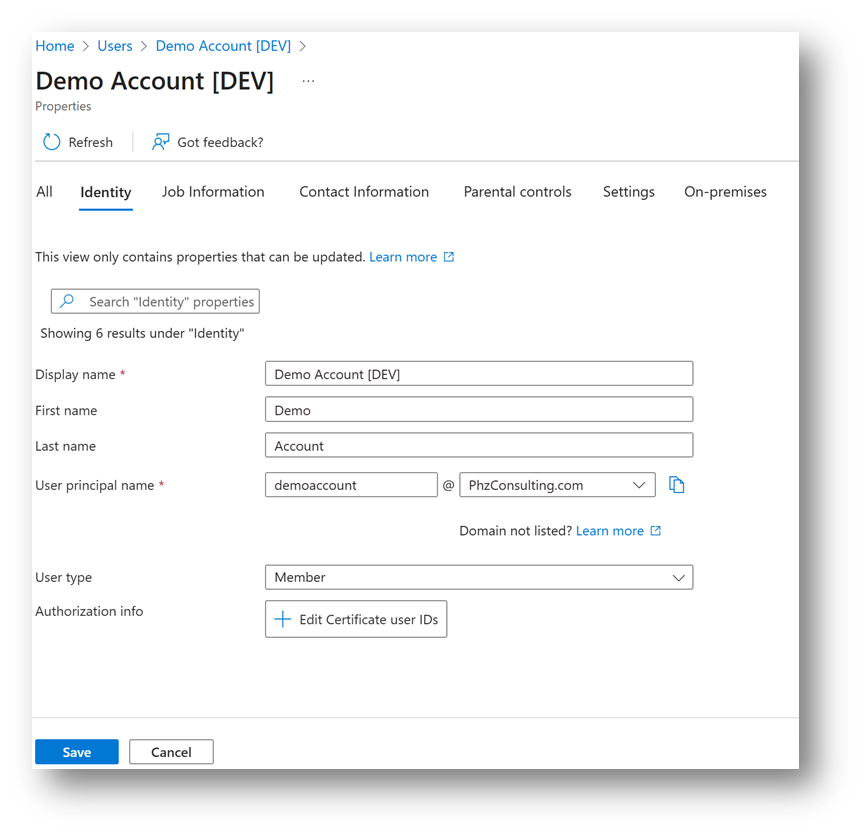
2. Sign in to the Microsoft Entra admin center with at least a Privileged Authentication Administrator role. Select the user you want to update and click Edit Properties.

3. Click Edit Certificate user IDs.

4. Click Add and enter the SKI, the format of the entry needs to follow the example syntax (Example: X509:<SKI> 2d27d870f06d9715b120c1ef500cf9e8b59f2b1d).

Validating the Login Experience
1. Go to https://entra.microsoft.com and enter your username. Also, insure your smart card is inserted.

2. On the Enter password screen select Use a certificate or smart card – depending on your configuration you may have an Other ways to sign-in option instead.

3. You will then get the web browser certificate picker prompt, select the certificate that corresponds to your smart card’s authentication certificate.

4. Enter your PIN then click OK and voila. You’re in your admin account with a strong phishing resistant MFA method.

Conclusion
That’s all it takes to link your PIV authentication certificate to a privileged account in Entra ID. By adding a secondary mapping like SKI, you can reuse the same card you rely on for your day-to-day account and extend it to your admin identity without introducing weaker factors into the mix. This keeps privileged sign-ins aligned with the phishing-resistant standard the government has been using for years. Once you’ve got this configured, you should take the next step and enforce it by using a Conditional Access policy with the Phishing-Resistant MFA authentication strength that Microsoft includes in every tenant by default. That way, your privileged accounts aren’t just capable of certificate-based logon they’re required to use it


Comments